TRENDY AND LIKING IT

image courtesy of - thetruthaboutguns.com

image courtesy of – thetruthaboutguns.com

We’re not usually ones to follow trends and such but, in this particular case, we’re really glad we did. We have developed a true passion for African keyhole gardens.

First, we should give you a bit of background. You would think that, living in the Pac Northwest, gardening should be as easy as sticking a seed in the ground and jumping back so that the instant sprout doesn’t hit you in the eye as it comes up. Now, that’s true is some areas but not ours. You see, we live along what is euphemistically referred to as the Hood Canal. It sound so much more romantic than “the leftover path of a long since melted glacier” – but that’s exactly what the Hood Canal is. This contrasts sharply to the alluvial plains found in Thurston, King, Snohomish and Pierce counties. There the dirt is rich, black and wonderful. Here – well we say – if you dig a one cubic foot hole you’ll get two bushels of rocks and a cup of sand. On the plus side, this makes for great drainage. Oh wait, plants need water – maybe that’s not as much of a plus as we’re trying to make out.

Anyway, we’ve tried several methods of vegetable gardening. We’ve tried it in the soil after adding tons of organic matter. We’ve tried raised beds. We’ve tried container gardening. Our best success has been with Hugelkultur, a method of gardening developed on the dry plains of eastern Germany and western Poland. We have mutant junkie sized chives and roses with this method so we decided to give it a go for vegetables as well.

Now, digging a pit three to four feet deep and measuring twelve feet across in this soil should have been one of Hercules’ labors. But, since the ancients probably didn’t know that Washington State was there it got left out of the list. (NOTE: I am not masochistic, stupid or Hercules) so, off I went to see our neighbor whose tractor has a backhoe attachment.

After finding out that I dug the first rose bed by hand over a week’s time, he very kindly made it available to dig the other Hugelkultur rose beds. Thus, I had every hope that he would lend it for the current project. And he would have, except the backhoe attachment was broken. He’s the same generous soul who had provided us with a bunch of old, broken concrete to use as a retaining wall for the new garden. (ANOTHER NOTE: The site we chose for the new garden is at the top of a small rise. Our plan was to excavate down into the hill and then build up a retaining wall on the downhill side.)

So, here we sat with a pile of concrete chunks and no hole for it to retain. For one brief, insane moment, I did consider tackling the project by hand – well, by spud bar, pick, and shovel. Fortunately, after a glass of Irish Whiskey (if you like whiskey, you really need to try Trader Joe’s SINGLE MALT Irish. It’s amazing! Sweet, full bodied, and very satisfying – but, as usual, I digress).

As I was saying, after a glass of ambrosia, I came to my senses and Colleen began to research alternatives that were less likely to result in my having a heart attack. (She DOES care! Amazing!). Her sister Judy, who was having imense success with a tiered garden, suggested that we look into African keyhole gardens. (HINT: Guys, women talk to each other about EVERYTHING. It’s part of the way they get things done. So, just expect that all her sisters and most of her friends know a whole lot more than you wish they did!)

Well, we tried them. There are some wonderful sites and several videos to help neophytes like us get started. It took about three days to break the concrete, excavate the water trap, stack the concrete, and fill the garden. It was a lot of initial work but now that it’s going, the garden is virtually effortless to maintain. Suffice it to say, we’ve never had results like this before. We’re sold and we encourage all of you to take the plunge. It’s fun, it’s attractive, and it’s very water efficient.

Be sure to check out the videos and links below the pictures. They’re the ones we found most helpful in our efforts.

The initial layout of the keyhole garden. It gets its name from the shape of the indentation combined with the round compost receiving hole. Seen from above they resemble the hole for a skeleton key.

The initial layout of the keyhole garden. It gets its name from the shape of the indentation combined with the round compost receiving hole. Seen from above they resemble the hole for a skeleton key.

Second course of broken up concrete.  It's starting to come into clearer focus now.

Second course of broken up concrete. It’s starting to come into clearer focus now.

The finished height of the garden. It stands about 24 inches tall and is 6 feet across at the widest part.

The finished height of the garden. It stands about 24 inches tall and is 6 feet across at the widest part.

Here's the moisture trap. This layer of rotten and old wood collects and holds water. The trap provides  improved soil moisture and helps conserve water that runs through. It's derived from the Hugelkultur experience.

Here’s the moisture trap. This layer of rotten and old wood collects and holds water. The trap provides improved soil moisture and helps conserve water that runs through. It’s derived from the Hugelkultur experience.

Next step, the compost tube. This is just a tube of wire mesh which measures 1 foot in diameter. I inserted a cardboard liner so that, when we filled the garden bed we would keep the dirt out of the compost tube. Also, notice that we've lined the bed itself with cardboard.  You see the alternating layers of green compost, brown compost (dry hay, straw, shredded cardboard, paper, sticks, twigs, etc) and dirt.

Next step, the compost tube. This is just a tube of wire mesh which measures 1 foot in diameter. I inserted a cardboard liner so that, when we filled the garden bed we would keep the dirt out of the compost tube. Also, notice that we’ve lined the bed itself with cardboard. You see the alternating layers of green compost, brown compost (dry hay, straw, shredded cardboard, paper, sticks, twigs, etc) and dirt.

It's really filling up now. Finally! A productive use for garden waste, tree trimmings and especially the ubiquitous and annoying Oak Ferns that take over everything around here.

It’s really filling up now. Finally! A productive use for garden waste, tree trimmings and especially the ubiquitous and annoying Oak Ferns that take over everything around here.

Here you can see that the compost tube is filling at the same rate as the garden bed. The trick here is to continually alternate layers of green and brown compost in the bed proper and cover each one with soil. We also added a whole bucket of dissolved worm castings (that's a nice word for poop) at this point. It smelled VERY agricultural and captured the attention of the otherwise bored dogs. However, the smell went away with the next layer of soil.

Here you can see that the compost tube is filling at the same rate as the garden bed. The trick here is to continually alternate layers of green and brown compost in the bed proper and cover each one with soil. We also added a whole 2 gallon bucket of dissolved worm castings (that’s a nice word for poop) at this point. It smelled VERY agricultural and captured the attention of the otherwise bored dogs. However, the smell went away when we covered it with the next layer of soil.

After the garden is filled to the rim, you continue piling up soil until it meets the top of the compost tube, about one foot higher than your wall. This gives you an incredible amount of 'plantable' space.  From now on you just dump your kitchen and yard waste into the tube. It breaks down very quickly. Ours goes down about one an a half inches a every four to five days - and it's fertilizing the garden as it does!

After the garden is filled to the rim, you continue piling up soil until it meets the top of the compost tube, about one foot higher than your wall. This gives you an incredible amount of ‘plantable’ space. From now on you just dump your kitchen and yard waste into the tube. It breaks down very quickly. Ours goes down about one an a half inches a every four to five days – and it’s fertilizing the garden as it does!

This is how the garden looked on May 25, 2015. We were so excited and it looked so good to us then.

This is how the garden looked on May 25, 2015. We were so excited and it looked so good to us then. You can just barely see the pumpkins on the back side of the mound. That green topknot is a basil plant from Trader Joe’s.

This is the same view of the garden three weeks later. Granted, we added two pepper plants, a Thai basil which you can't see behind the Sweet 100 tomato plant. but still, it's just phenomenal how quickly things grew. That green wall on the back side is made up of the pumpkins which you could barely see in the preceding photo.

This is the same view of the garden three weeks later. Granted, we added two pepper plants, a Thai basil which you can’t see behind the Sweet 100 tomato plant. but still, it’s just phenomenal how quickly things grew. That green wall on the back side is made up of the pumpkins which you could barely see in the preceding photo. And look at the Trader Joe’s basil! We take off a dozen or more leaves each week and we can’t even see where they were!

Here's a shot of the pumpkins. We've had to build a netting out of concrete reinforcing mesh in order to keep them off the ground. On the far side of the pumpkins are two lemon cucumbers which will share the netting. As of today, we're going to have to get another piece of mesh to extend the platform since the pumpkins have almost outgrown it already.

Here’s a shot of the pumpkins. We’ve had to build a netting out of concrete reinforcing mesh in order to keep them off the ground. On the far side of the pumpkins are two lemon cucumbers which will share the netting. As of today, we’re going to have to get another piece of mesh to extend the platform since the pumpkins have almost outgrown it already.

http://www.inspirationgreen.com/keyhole-gardens.html

http://www.hgtvgardens.com/raised-garden/keyhole-gardening-tips

GROWING THE GARDEN

It’s summer and here in the Northwest, for many of us, our obsession with gardening is in full swing.  It started slowly, softly in March. There were hushed whispers of, “Look! Bedding plants!” as we wandered into stores everywhere. Then, the garden centers suddenly burgeoned with new plants, shrubs, and trees. Suddenly you see people exiting Costco with their “ganga* sized” hanging fuchsia baskets and the ubiquitous “color baskets”. Trees sprout from half closed trunk lids and the interiors of cars look like dense forests because they are packed with shrubs and perennials.

Those days are behind us (at least for this year) and we are now refining, tuning, tweaking (NOT twerking) the garden. That means looking to the fertilizing, trimming, grooming of the plants and ensuring that the watering system  is up to snuff and working correctly. (Yes, even here in the Northwest – famous for its rain – we need to water some things in the summer months.)

That’s where this blog comes in. You see, I can be a rank pragmatist at times. If the watering system works it’s alright with me if the sprayers are mounted on lengths of cedar grape stakes. It’s naaatural! Colleen, however, holds with different views. Oh, I’ve acceded to the occasional garden ornament. You  know the kind, bright bits of decorative glass in discs or globes (or is that globs?? never mind!) adorning a rickety bit of quasi steel rod. But, I tend to believe it’s a garden so the plants should be the stars. OH! How wrong I was! I know that reads sarcastically but, really, I was wrong.

beautiful hand blown glass ornaments from the talented Chris Rich. Rich Glass Studios - Portland, OR - it has a place of pride in the garden

beautiful hand blown glass ornaments from the talented Chris Rich. Rich Glass Studios – Portland, OR – it has a place of pride in the garden

Colleen suggested that we find some more “cute sparklies” and put the sprayers on them. So, off to our local discount mega store we went – where we suffered acute sticker shock. Cheap, tacky and insubstantial looking ornaments were selling for 4 times what they did a mere 5 years ago. I’m not averse to paying $7 or $8 dollars for something mass manufactured but I do draw the line at $30 or more. Our custom blown glass ornament from Rich Glass Studio in Portland wasn’t all that much more and it’s art, not schlock.

Anyway, we abandoned the megastore and headed to the usual aftermarket places. Goodwill, Ross, TJ Maxx, Tuesday Morning… you get the idea. Anyway, as we were shopping we evolved an entirely new idea. We decided to add some interesting variations to our (Colleen’s) original idea.

Meeting with overwhelming success, we hauled our trove or trinkets and ornaments home. By the way, they cost us less than two of the mass produced schlock ornaments at the so called discount megastore. Then, as with all things about us, I took her original concept and modified it to be yet something else. Whether it’s writing, decorating, or gardening, we work best as a synergistic team. Or at least, we think we do. You be the judge. Comments gratefully received.

Oddly enough, our dear friends Gareth and Michelle came over for the ‘Post 4th’ barbecue at our house. They had intended to come over and see the ornaments anyway and this made it something of an occasion. Ironically, two days later, Gareth sent me an article on making an interesting entry and walk through your garden. Guess what they had as a suggestion. Odd bits of glass and decoration to capture the viewer’s eye and imagination. Cool! and we did it ahead of time!

And, if you find yourself in Portland of a Saturday in the summer, drop by Rich Glass’ booth at the Saturday Market and say hey. You will not be disappointed.

*GANGA – a colloquial Spanish word meaning bargain. A common hyperbole in advertisements, especially those of ‘olde’ for El Gigante in Tucson, AZ – Ah! Good times! Good times!.

Brass tone urn with a sparkler hummingbird inside. The sprinkler head is barely visible above the flower.

Brass tone urn with a sparkler hummingbird inside. The sprinkler head is barely visible above the flower.

A whimsical faucet and bucket retasked to be both planter and sprinkler host. A few quick holes for drainage and voila! That vinca is HAPPY in there.

A whimsical faucet and bucket retasked to be both planter and sprinkler host. A few quick holes for drainage and voila! That vinca is HAPPY in there.

Again, whimsy in metal. This bird looked very steampunk to us so - we HAD to have it. the sprinkler head peeks out from the top of his tail. And the bowl serves as an auxiliary water source for the birds that visit us.

Again, whimsy in metal. This bird looked very steampunk to us so – we HAD to have it. the sprinkler head peeks out from the top of his tail. And the bowl serves as an auxiliary water source for the birds that visit us.

This sun, star, and planet sparkler was fitted through the bottom of an Indian inspired openwork metal basket. We nestled it into the rhododendron. When it blooms purple next spring it should be spectacular.

This sun, star, and planet sparkler was fitted through the bottom of an Indian inspired openwork metal basket. We nestled it into the rhododendron. When it blooms purple next spring it should be spectacular.

This cast figure of an African herdsman was affixed to a piece of rock using high strength epoxy glue. He appears to be cast in bronze which makes the $7 we paid for the pair a real steal. Look for the water sprinkler in the detail pictures.

This cast figure of an African herdsman was affixed to a piece of rock using high strength epoxy glue. He appears to be cast in bronze which makes the $7 we paid for the pair a real steal. Look for the water sprinkler in the detail pictures.

A straight on view of the herdsman reveals nothing. But it is a surprise to passers by when they realize that stick has a face, hands, feet and a herding stick.

A straight on view of the herdsman reveals nothing. But it is a surprise to passers by when they realize that stick has a face, hands, feet and a herding stick.

The herdsman's mate. You can see the position of the microsprayer now. It nestles perfectly at the base of each figure's skull. Cute, whimsical, and practical. Truly garden ornaments at their best and truly unique.

The herdsman’s mate. You can see the position of the microsprayer now. It nestles perfectly at the base of each figure’s skull. Cute, whimsical, and practical. Truly garden ornaments at their best and truly unique.

Technically not part of this exercise but the birdbath filler hose was fed up through the body of a dysfunctional copper sprinkler that we cut off. With a piece of left over copper plumbing pipe and a fitting costing less than $2 we made this lovely filler for the bath. It just shows you what you can do with a bit of imagination.

Technically not part of this exercise but the birdbath filler hose was fed up through the body of a dysfunctional copper sprinkler that we cut off. With a piece of left over copper plumbing pipe and a fitting costing less than $2 we made this lovely filler for the bath. It just shows you what you can do with a bit of imagination.


THE UGLY DUCKLING – JUNIPER STYLE

Okay, it has nothing to do with gardening, bonsai, or the PAC - NW but I really love that the Beloved Troll's minions thought they could march into a British business and demand that they stop lampooning the Supreme Toad. Bless the owner and the Met for telling them to piss off!

Okay, it has nothing to do with gardening, bonsai, or the PAC – NW but one could argue it has a lot to do with ugly. I really love that the Beloved Troll’s minions thought they could march into a British business and demand that they stop lampooning the Supreme Toad. Bless the owner and the Met for telling them to piss off! Score TWO for the swans!- image courtesy of mashable.com


That brings us to today’s gardening tale. But first, you need to know that we have had a fairly long love affair with bonsai. I blame it on being born in Japan and Colleen traces her roots (pardon the pun) to a neighbor from her childhood. Now, we started doing bonsai on a less than optimal climate – the Arizona desert. And, throughout the years we’ve persisted, which is what doing bonsai takes – dogged, irrational, irrepressible persistence (in that respect, it’s a lot like writing.) Anyway, we got proficient enough that we actually transported several prized trees from our former desert abode to the Northwest when we moved here.

One such specimen was a “really neat” buffalo juniper. Now, these are among the most ineptitude proof plants for bonsai. They are tough, rugged plants that thrive in almost any environ. Yet, when we got it here to the land of rain, it started taking a turn for the worse. We suspect it was just shocked to have so much water combined with so little sunshine. Now, whenever a bonsai goes into shock, the best chance of reviving it you have it to yank it out of its pot and plop it into the dirt. So, after trying everything else short of animal sacrifice, we finally uprooted the juniper and stuck it in the ground with instructions to thrive or perish; after which we promptly forgot about it.

Being the kind of plant it is – stubborn, obstinate, and contrary – it chose to flourish with neglect. Which brings us to last weekend. After four years of being treated like the Dread Pirate Roberts handled Wesley (“Good night Wesley. Well done. I’ll most likely kill you in the morning.” – Oh come on! You HAVE to have seen the Princess Bride, right? It’s chock a block full of useful, quotable dialogue!) OOPS! off task again. Anyway, after four years of being ignored, we put it back into a pot. This is a great opportunity to see how a seemingly ugly bush goes to bonsai in training (or, in this case, retraining) in a matter of an hour or so. You also get to see what a mess the back porch becomes as we begin addressing the winter’s effect on the garden at large. Enjoy and we hope you find the juniper’s transformation as amazing as we did.

Buffalo Juniper just pulled from the ground and plopped into its training pot. Just look at that leggy, ugly, mangy mess!

Buffalo Juniper just pulled from the ground and plopped into its training pot. Just look at that leggy, ugly, mangy mess!

This is the same juniper after the initial trimming. Notice how the center is opened up. At this stage, we decided to train it as a cascade or semi-cascade style tree.

The broken branch at the left is called a 'Jin'. It's traditional to have only one on a bonsai but that branch jutting out to the right just cried out for some attention.

The broken branch at the left is called a ‘Jin’. It’s traditional to have only one on a bonsai but that branch jutting out to the right just cried out for some attention.

Here you can see the heavy gage training wire wrapped around the trunk and out the branches. It will be progressively lowered to force the main branch downward into the cascading position. Also note what we did with the right hand jin. All it took was a bit of cutting with a tree saw and a pair or needle nose pliers and - ta da - instant drama! Colleen described it as adding 'motion' and 'fluidity' to the tree. I must concur.

Here you can see the heavy gage training wire wrapped around the trunk and out the branches. It will be progressively lowered to force the main branch downward into the cascading position. Also note what we did with the right hand jin. All it took was a bit of cutting with a tree saw and a pair or needle nose pliers and – ta da – instant drama! Colleen described it as adding ‘motion’ and ‘fluidity’ to the tree. I must concur.

Here you see the overall view of the wired tree. It is now ready for the plant hospital for a few days of rest and recovery and then we'll continue training it to droop on the right side and adapt to smaller and smaller pots.

Here you see the overall view of the wired tree. It is now ready for the plant hospital for a few days of rest and recovery and then we’ll continue training it to droop on the right side and adapt to smaller and smaller pots.

HUGELKULTUR, WONDERFUL HUGELKULTUR

Greetings readers. This is the first post composed entirely via our tablet. That said, please forgive any spelling or editing errors.

You may recall that several posts ago we promised to spend some time discussing hugelkultur. Well, since spring is here (okay, almost here – but it’s close!) It seemed a good time to visit the topic. So, let’s start with the question, “Just what the heck is hugelkultur anyway?”  It is a gardening system designed to make sustainable horticulture in climates that experience very wet periods followed by extremely dry ones. Oddly enough, its roots are to be found in Eastern Europe.

What is entailed is to make a mound comprised of logs – which act as moisture traps; layered with twigs and branches – which add aeration; layered with straw, soil, and compost – which compost under the final layer of soil; thereby adding warmth and nutrients. For weed suppression, we add a final layer of cardboard followed by mulch. The cardboard needs to be the corrugated kind. This makes an  ideal nesting place for earthworms which, as you have no doubt already guessed, add to the efficiency of the whole system.

We can go into the process more in a later post because today, we want to show you the effects of hugelkultur.

As many of you know, we live in the Northwest. Summers are short, winters are long, and anything you can do to get a jump on the growing season is good. Perhaps that is why you see more greenhouses per capita here than just about anywhere in the country. (Okay, there’s no sciensce backing this claim but it seems true.) That aside, we want to show you the effects of hugelkultur by comparing 4 maple trees around our yard.

image

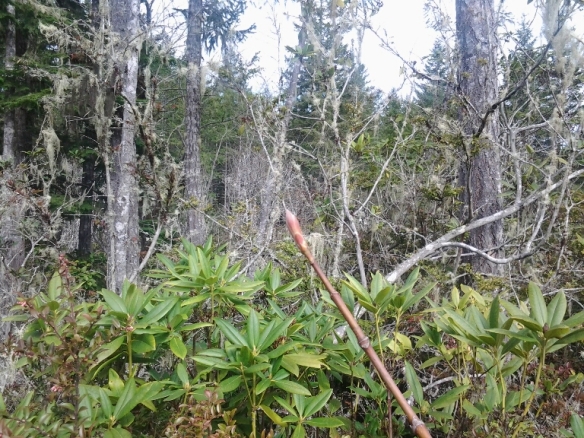
This first photo is of a native Big Leaf maple. These hardy natives are just beginning to show their leaf buds. Notice that the bud is emerging from its protective sheath but still being a bit self protective because of the cool daytime temperatures and even cooler overnight ones.

image

This is one of the baźillion species of Acer Japonicum that you find all throughout the Northwest. This little darling is in a protected area of the yard, just at the forest edge. It has great drainage and yet, it shows only the hard exterior sheathing over its leaf buds.

image

This is the same (or similar) variety of maple as the one above. It is in a protected area near the foundation of the house. Notice how its leaves more closely resemble those of the native Big Leaf maple. This tree has obviously benefited from the warmth that the foundation has imparted to the surrounding soil.

image

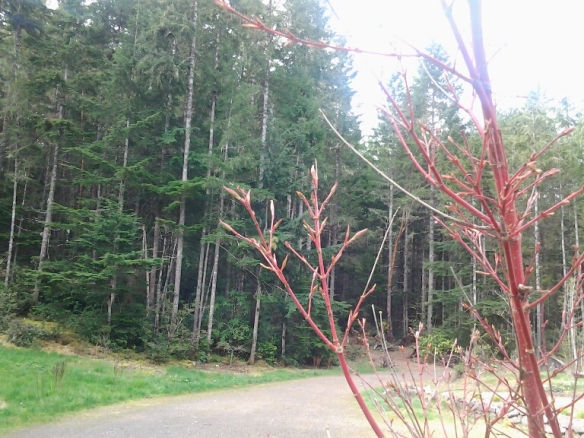
This is a coral bark maple. These are planted as much for the color they impart to the winter landscape as for their lovely lime green foliage. This maple wintered over in a half whiskey barrel planter. Notice that its leaves are alos just emerging. Another example of heat trapping and insulation benefiting the plant’s health and progress.

image

Lastly, we see the same variety of coral bark maple but this time it has been planted in a huglekultur bed. Now, this bed is inside our shade garden. It is far colder inside there. In fact, on a recent walk we passed by it on a day when the ambient temperature was about 70 degrees. There was a decidely cold emianation from the shade garden. It was probably 10 degrees colder inside than outside the area yet, the maple inside it is further along than any of the others we have looked at.

So, you can see for yourself that our very unscientific study of five similar trees in five disparate locations shows us that hugelkultur can have a profound effect on plant growth.

Needless to say, I see far more hugelkultur planting on the horizon. For more adventures in Northwest hugelkultur gardening, visit Erica’s site.

GARDENING AND RECYCLING ALL IN ONE

We live in the country as you already know but there are times when we want to do some container gardening. For example, like when we want to plant a new variety of mint. Mint is among the most persistent and pernicious garden plants in the known universe. Once mint gets a foothold in the ground, it invades everything else, sometimes even choking out those prized ornamentals. (Hence the contention that it is pernicious. But that’s another rant all together.)

Other times you just want to get a plant into a large enough container that it has room to grow or winter over before the place you have chosen for it is ready to go. But putting plants in large containers can be a problem, can’t it? Even if you use a resin or other light weight pot, by the time you drop two cubic feet of potting soil in it, the pot weighs a ton. Especially if you live in the city and want to do container gardening, mobility might be important whether it’s to protect them in colder months, or to prevent sunburn. Or maybe you’re like us and just like to shift things around from time to time.

Whatever your reason, you need to know something about most plants (herbs, flowers, veggies like cucumbers, zucchini, etc – really pretty much anything other than shrubs and trees.) They only need between 8 and 12 inches of soil to thrive. So, why fill a 20 inch deep pot with potting soil, right? It’s heavy and it’s expensive.  Once you use that much dirt, then you need one of those rolling plant stands which are either very expensive or very cheesy. So how do you beat the problem? Easy, Styrofoam.

That’s right, Styrofoam. That clunky, bulky, packing material that no one wants to recycle. I don’t know about your waste collector but ours says that Styrofoam is non-recyclable and should be treated as trash. In other words, it ends up in a land fill where it doesn’t decompose. We don’t want to get into the ‘environmental effects’ debate, we just want to focus on the fact that you’re chucking away something that does not go away. 

Whether you use the packing peanuts or big chunks you can layer the bottom of you large plant containers to save money, reduce weight and improve drainage. Drainage is key to plant health. It reduces disease, allows oxygenation and prevents plants from drowning. A quick note here. If you use packing peanuts, consider putting them into one of those net bags that potatoes or onions come in. If you decide to retask your pot later, or change out the soil, it’ll be a lot easier if you aren’t chasing Styrofoam bits about the patio.  Here’s a simple pictorial primer on how to use Styrofoam to lighten your containers, help reduce landfill waste, and get better drainage for your plants.

This project is for a honeysuckle that has been languishing in a pot. It needs somewhere to survive the winter until we get the ground prepared for the new woodshed, which it will adorn.

Step 1: The pot

step 1

This is a hulking great ceramic pot from Costco that has been home to bamboo, Japanese Maples, and now honeysuckle. It’s already heavy and we don’t need to fill it with 2 cubic feet of soil.

Step 2: Line the bottom with chunks of Styrofoam packing

step-2

Be sure make your base relatively as level and fill in as many gaps as you can. Remember, you’re putting dirt and a plant atop this base so it needs to be firm. The formula is: make your Styrofoam layer deep enough that you have room for 2 – 3 inches of soil atop it and another inch left at the top for topdressing.

Step 3: Weed fabric

step-3

After your packing is in the pot, cover the top of the Styrofoam with weed fabric. We suggest using this because it lets water through and will not decompose like paper, cardboard, etc. You want your plant on a relatively permanent base. There’s nothing worse than having your lovely container emulate a Florida sinkhole one day.

Step 4: Start with the dirt

step-4

Put in a layer of dirt, potting soil, whatever, that will raise your plants up to within an inch of the lip. Remember, this should usually be about 2 or 3 inches deep to permit root growth. The inch at the top ensures that you have adequate room for watering.

Step 5: Setting the plant

step-5

Set your plant or plants on the base layer of soil. Once you have them arranged begin filling between them. Remember, plants grow so don’t overcrowd them to begin with. Leave room for them to fill in and take on that lush, tangled look by themselves.

Step 6: Topdressing or mulch

step-6

Once you have back filled, we strongly urge you to top-dress the soil with some form of mulch. This prevents weed growth, aids in moisture retention, and basically finishes off the look of you work.

The finished product

>step-7

Here is our newly container planted honeysuckle next to a pot of oregano, thyme, and rosemary (again with a Styrofoam base in it). All told, it probably took somewhere around 40 minutes to complete, and that includes moving that monster of a pot.

Enjoy container gardening. It’s great for growing fresh herbs and beautiful flowers and it’s a whole lot less likely to wrench your back out if you reuse your Styrofoam packing as a base in your larger pots.